Author: Derek Leung
Product version: 2024.1.X
Need
Customer wants to install Semarchy xDI Runtime on AWS ECS to enable scalable, flexible, and cost-effective deployment of this data management platform in cloud environment.
Summarized Solution
On a high level this installation needs to setup a RDS cluster where the database will be hoisted and a setup of xDI Runtime docker image on ECS container. To access both DB and xDI, the respective inbound rules are needed to open the connection ports.
This article provides instruction on how to install RDS with or without SSL encryption and assumes your are creating an HTTP based ECS container. If you require HTTPS to be enabled on your instance browse related articles in our KB or on AWS support site to get instructions.
Detailed Solution
Prerequisites and requirements
Review the information in this section before you begin the installation.
You will need the following to install Semarchy xDI on AWS:
- An AWS subscription. If you don’t have an AWS subscription, create a free account before you begin. This user requires administrator privileges.
- The AWS command-line interface (CLI). It is installed and configured with your AWS account. For more information, see Getting started with the AWS CLI.
- One AWS Virtual Private Cloud (VPC). It is configured with at least two subnets from different availability zones. For more information, see Create an IPv4-enabled VPC and subnets using the AWS CLI.
- A SQL management tool, such as DBeaver, pgAdmin or another one.
Step 1. Check the AWS credentials
To access AWS services with the AWS CLI, you need at minimum an AWS account and IAM credentials.
Installing or updating to the latest version of the AWS CLI
https://docs.aws.amazon.com/cli/latest/userguide/getting-started-install.html
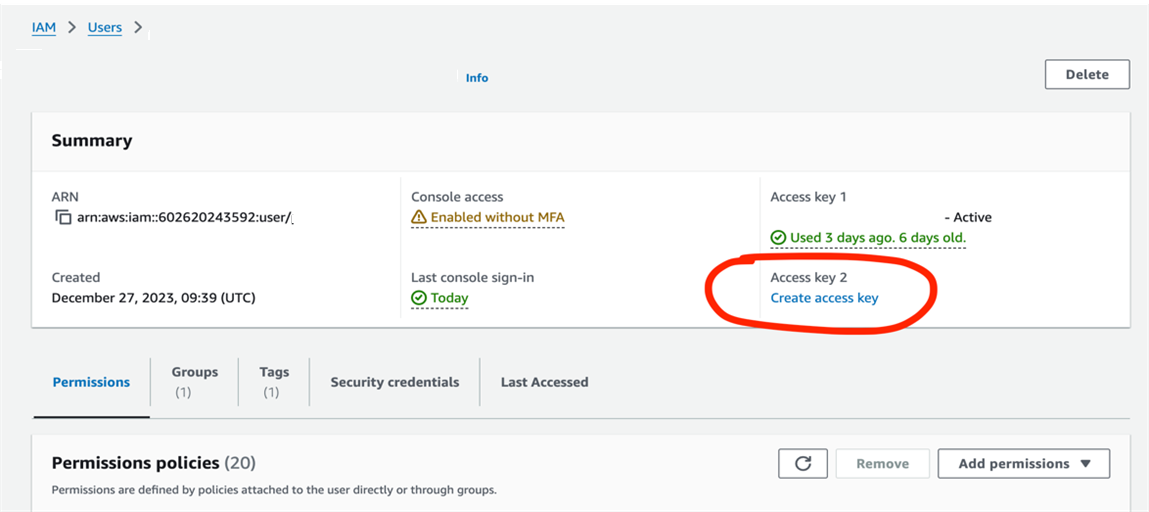
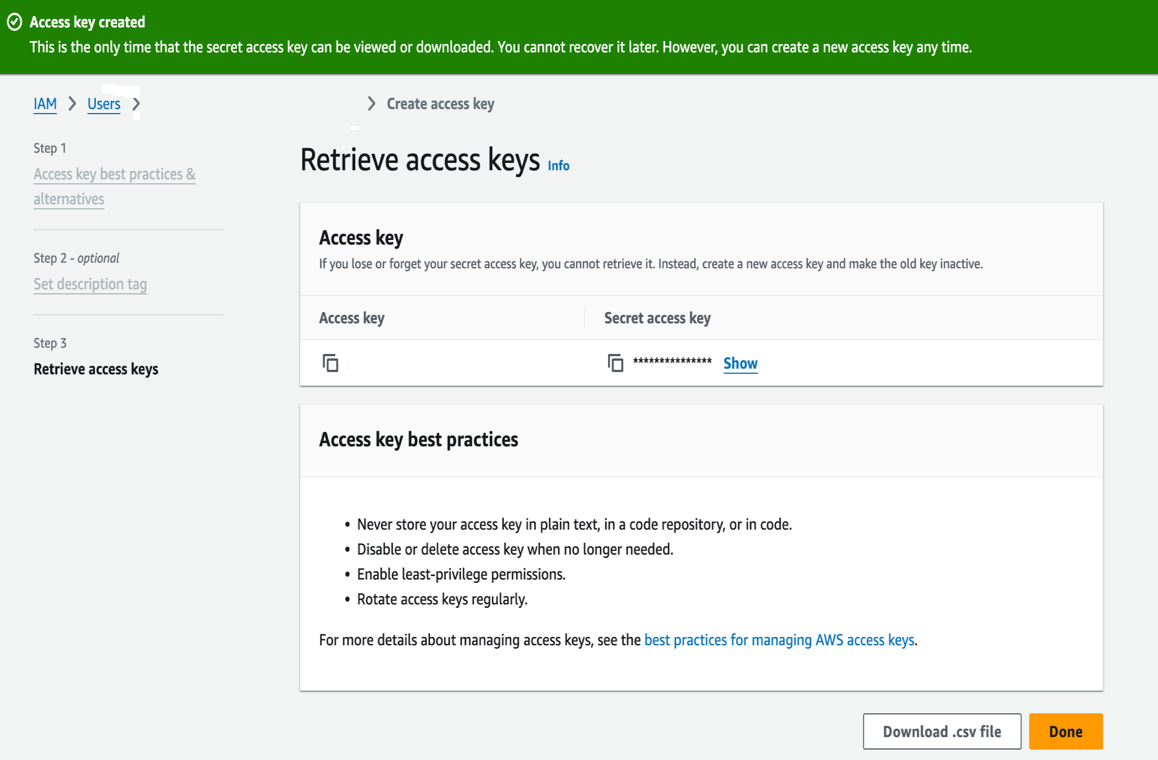
Create an access key and secret token to configure AWS.
This is the only time that the secret access key can be viewed or downloaded. You cannot recover it later. However, you can create a new access key any time.
1. Go to IAM - Users - <Your user> --> Create access key


To check all iam users – use the following command:
aws iam list-users
To check only your user, you can use the following command:
aws iam get-user
Step 2. Create the Aurora RDS instance
Note: the below scripts use the default vpc and subnets. Ensure your vpc and subnets are properly configured and if you are not using default you might need to add those parameters in the script
Note: across all items in this article we are using the following names that you can change for your installation:
DB cluster ID: uk-xdi
Master user name: postgres
Master user password: <your_password>
Database name: postgres
DB cluster ID: uk-xdi
Master user name: postgres
Master user password: <your_password>
Database name: postgres
aws rds create-db-cluster \
    --db-cluster-identifier uk-xdi \
    --engine aurora-postgresql \
    --master-username postgres\
    --master-user-password <your_password>\
    --database-name postgres \
    --tags Key=xdi-ecs
2. Run the following command to create the writer instance:
aws rds create-db-instance \
    --db-cluster-identifier uk-xdi \
    --db-instance-identifier instance-1 \
    --db-instance-class db.t4g.medium \
    --engine aurora-postgresql \
    --db-subnet-group-name default \
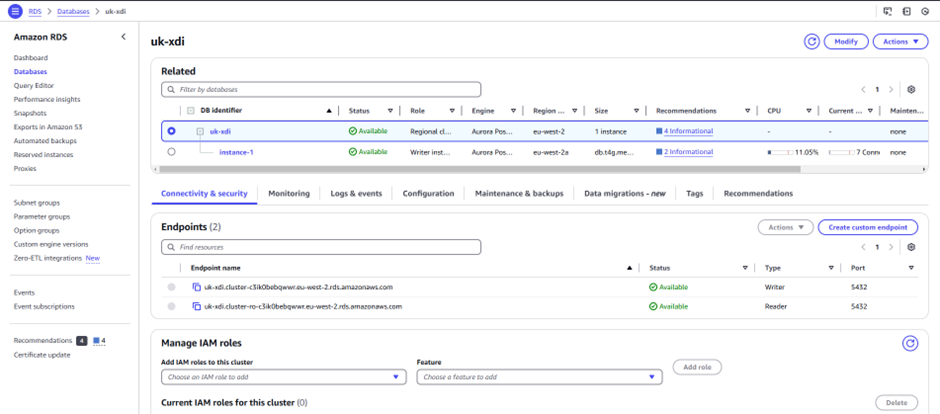
--tags Key=xdi-ecs4. Follow the cluster and instance creation progress using the AWS console and wait for their status to change to Available (estimated time: 10 minutes). Note the endpoint URLs for later:

Step 3. Create an inbound rule for DB instance accessibility
1. Go to the DB instance on RDS

2. Go to Connectivity & Security and under Security section click on link for VPC security groups.

3. Go to Security group ID

4. Add an inbound rule for port 5432

5. Using any DB client try to connect to DB

You can get connect details as below.
6. For Host name and port go to the DB instance RDS > Databases > uk-xdi > instance-1 > Connectivity and Security
7. Go to Configuration for the DB Name

8. Create a schema in DB.
CREATE USER    xdi WITH PASSWORD 'xdi';

GRANT xdi to postgres;

CREATE SCHEMA   runtime AUTHORIZATION xdi;

GRANT USAGE ON SCHEMA runtime TO public;

9. Download the xDI Tutorial Resources, find the “init-database-resources.sql”. Run this SQL under runtime schema

Step 4. Create EFS for ECS
The xDI Runtime Container running on ECS Cluster needs to mount an Amazon EFS for storing the configuration and modules.
Consult IT for the following privileges to create EFS:
elasticfilesystem:TagResource
elasticfilesystem:DeleteFileSystem


For the Security Group used by this EFS, configure an inbound rule to enable NFS port 2049
To upload configuration onto the EFS, we need an EC2 instance. First,
make sure the EFS is using the same Security Group as the EC2 instance
Add the inbound rules to allow NFS traffic within the same security group

SSH to an EC2 instance, create the mount-point /mnt/efs-xdi
ubuntu@ip-172-31-26-138:/mnt$ sudo mkdir efs-xdi
ubuntu@ip-172-31-26-138:/sbin$ sudo apt install nfs-common
Reading package lists... Done
Building dependency tree... Done
Reading state information... Done
The following additional packages will be installed:
  keyutils libnfsidmap1 rpcbind
Suggested packages:
  watchdog
The following NEW packages will be installed:
  keyutils libnfsidmap1 nfs-common rpcbind
0 upgraded, 4 newly installed, 0 to remove and 80 not upgraded.
Need to get 381 kB of archives.
After this operation, 1447 kB of additional disk space will be used.
Do you want to continue? [Y/n] Y
Get:1 http://eu-west-2.ec2.archive.ubuntu.com/ubuntu jammy-updates/main amd64 libnfsidmap1 amd64 1:2.6.1-1ubun                                         tu1.2 [42.9 kB]
Get:2 http://eu-west-2.ec2.archive.ubuntu.com/ubuntu jammy/main amd64 rpcbind amd64 1.2.6-2build1 [46.6 kB]
Get:3 http://eu-west-2.ec2.archive.ubuntu.com/ubuntu jammy/main amd64 keyutils amd64 1.6.1-2ubuntu3 [50.4 kB]
Get:4 http://eu-west-2.ec2.archive.ubuntu.com/ubuntu jammy-updates/main amd64 nfs-common amd64 1:2.6.1-1ubuntu                                         1.2 [241 kB]
Fetched 381 kB in 0s (10.7 MB/s)
Selecting previously unselected package libnfsidmap1:amd64.
(Reading database ... 146465 files and directories currently installed.)
Preparing to unpack .../libnfsidmap1_1%3a2.6.1-1ubuntu1.2_amd64.deb ...
Unpacking libnfsidmap1:amd64 (1:2.6.1-1ubuntu1.2) ...
Selecting previously unselected package rpcbind.
Preparing to unpack .../rpcbind_1.2.6-2build1_amd64.deb ...
Unpacking rpcbind (1.2.6-2build1) ...
Selecting previously unselected package keyutils.
Preparing to unpack .../keyutils_1.6.1-2ubuntu3_amd64.deb ...
Unpacking keyutils (1.6.1-2ubuntu3) ...
Selecting previously unselected package nfs-common.
Preparing to unpack .../nfs-common_1%3a2.6.1-1ubuntu1.2_amd64.deb ...
Unpacking nfs-common (1:2.6.1-1ubuntu1.2) ...
Setting up libnfsidmap1:amd64 (1:2.6.1-1ubuntu1.2) ...
Setting up rpcbind (1.2.6-2build1) ...
Created symlink /etc/systemd/system/multi-user.target.wants/rpcbind.service → /lib/systemd/system/rpcbind.serv                                         ice.
Created symlink /etc/systemd/system/sockets.target.wants/rpcbind.socket → /lib/systemd/system/rpcbind.socket.
Setting up keyutils (1.6.1-2ubuntu3) ...
Setting up nfs-common (1:2.6.1-1ubuntu1.2) ...

Creating config file /etc/idmapd.conf with new version
Creating config file /etc/nfs.conf with new version
Adding system user `statd' (UID 117) ...
Adding new user `statd' (UID 117) with group `nogroup' ...
Not creating home directory `/var/lib/nfs'.
Created symlink /etc/systemd/system/multi-user.target.wants/nfs-client.target → /lib/systemd/system/nfs-client                                          .target.
Created symlink /etc/systemd/system/remote-fs.target.wants/nfs-client.target → /lib/systemd/system/nfs-client.                                          target.
auth-rpcgss-module.service is a disabled or a static unit, not starting it.
nfs-idmapd.service is a disabled or a static unit, not starting it.
nfs-utils.service is a disabled or a static unit, not starting it.
proc-fs-nfsd.mount is a disabled or a static unit, not starting it.
rpc-gssd.service is a disabled or a static unit, not starting it.
rpc-statd-notify.service is a disabled or a static unit, not starting it.
rpc-statd.service is a disabled or a static unit, not starting it.
rpc-svcgssd.service is a disabled or a static unit, not starting it.
rpc_pipefs.target is a disabled or a static unit, not starting it.
var-lib-nfs-rpc_pipefs.mount is a disabled or a static unit, not starting it.
Processing triggers for man-db (2.10.2-1) ...
Processing triggers for libc-bin (2.35-0ubuntu3.8) ...
Scanning processes...
Scanning candidates...
Scanning linux images...
Restarting services...
 systemctl restart irqbalance.service packagekit.service polkit.service
Service restarts being deferred:
 /etc/needrestart/restart.d/dbus.service
 systemctl restart networkd-dispatcher.service
 systemctl restart unattended-upgrades.service

No containers need to be restarted.
No user sessions are running outdated binaries.
No VM guests are running outdated hypervisor (qemu) binaries on this host.

ubuntu@ip-172-31-26-138:/sbin$ sudo mount -t nfs4 fs-0d61960da9d1cb572.efs.eu-west-2.amazonaws.com:/ /mnt/efs-xdi
Create the subdirectory structure under /mnt/efs-xdi
/mnt/efs-xdi/runtime/deliveries/
/mnt/efs-xdi/runtime/modules/
/mnt/efs-xdi/runtime/properties/
Grant 777 to all the sub-folders
ubuntu@ip-172-31-26-138:/mnt/efs-xdi$ sudo chmod 777 *
Use FileZilla to upload runtime modules (HSQL & BACKEND-DATABASE (PostgreSQL))
Use FileZilla to upload runtime properties/engineParameters.xml

 <scheduler>
               <!-- Main properties -->
               <parameter name="org.quartz.scheduler.instanceName" value="XDI_RUNTIME_SCHEDULER"/>
               <parameter name="org.quartz.scheduler.instanceId" value="XDI_RUNTIME_SCHEDULER"/>
               <!-- Configure ThreadPool -->
               <parameter name="org.quartz.threadPool.class" value="org.quartz.simpl.SimpleThreadPool"/>
               <parameter name="org.quartz.threadPool.threadCount" value="50"/>
               <parameter name="org.quartz.threadPool.threadPriority" value="5"/>
               <!-- Configure Jobstore -->
               <parameter name="org.quartz.jobStore.misfireThreshold" value="10000"/>
               <parameter name="org.quartz.jobStore.class" value="org.quartz.impl.jdbcjobstore.JobStoreTX"/>
               <parameter name="org.quartz.jobStore.driverDelegateClass" value="org.quartz.impl.jdbcjobstore.PostgreSQLDelegate"/>
               <parameter name="org.quartz.jobStore.useProperties" value="false"/>
               <parameter name="org.quartz.jobStore.dataSource" value="database01"/>
               <parameter name="org.quartz.jobStore.tablePrefix" value="runtime.STB_"/>
               <parameter name="org.quartz.jobStore.isClustered" value="false"/>
               <!-- Configure Datasources -->
               <parameter name="org.quartz.dataSource.database01.driver" value="org.postgresql.Driver"/>
               <parameter name="org.quartz.dataSource.database01.URL" value="jdbc:postgresql://instance-1.xxxx.eu-west-2.rds.amazonaws.com:5432/postgres?currentSchema=xdi"/>
               <parameter name="org.quartz.dataSource.database01.user" value="postgres"/>
               <parameter name="org.quartz.dataSource.database01.password" value="<your_password>"/>
               <parameter name="org.quartz.dataSource.database01.connectionProvider.class" value="com.indy.engine.scheduler.XdiQuartzConnectionProvider"/>
               <parameter name="org.quartz.dataSource.database01.maxConnections" value="5"/>
               <parameter name="org.quartz.dataSource.database01.validationQuery" value=""/>
               <parameter name="org.quartz.dataSource.database01.module" value="BACKEND-DATABASE"/>
        </scheduler>

<!-- Session Log Database Configuration      -->
        <logs>
               <!--
               ==============================
               PostgreSQL Log Database
               ==============================
               -->
               <log userLogName="SESSIONLOG" autoUpdate="true" userLogClass="com.semarchy.xdi.runtime.sessionlog.RdbmsLogger">
                       <parameter name="userLogRdbmsDriver" value="${environment.variable:XDI_RUNTIME_SESSIONLOG_DB_JDBC_DRIVER_CLASS_NAME:org.postgresql.Driver}"/>
                       <parameter name="userLogRdbmsUrl" value="${environment.variable:XDI_RUNTIME_SESSIONLOG_DB_JDBC_URL:default}"/>
                       <parameter name="userLogRdbmsUser" value="${environment.variable:XDI_RUNTIME_SESSIONLOG_DB_JDBC_USER:default}"/>
                       <parameter name="userLogRdbmsPassword" value="${environment.variable:XDI_RUNTIME_SESSIONLOG_DB_JDBC_PASSWORD:default}"/>
                       <!--<parameter name="userLogRdbmsEncryptedPassword" value="${environment.variable:XDI_RUNTIME_LOGDB_JDBC_PWD:}"/>-->
                       <parameter name="userLogRdbmsModule" value="BACKEND-DATABASE"/>
                       <parameter name="userLogRdbmsSchemaName" value="${environment.variable:XDI_RUNTIME_SESSIONLOG_DB_JDBC_SCHEMA:public}"/>
                       <parameter name="userLogRdbmsVarcharType" value="varchar"/>
                       <parameter name="userLogRdbmsVarcharMaxSize" value="1000"/>
                       <parameter name="userLogRdbmsNumericType" value="numeric"/>
                       <parameter name="userLogRdbmsClobType" value="text"/>
                       <parameter name="userLogRdbmsBlobType" value="bytea"/>
                       <parameter name="userLogRdbmsUseSchemaNameForIndexCreation" value="false"/>
                       <parameter name="userLogRdbmsDeleteSyntaxe" value="Delete from"/>
                       <parameter name="userLogRdbmsCompressedLevel" value="bestCompression"/>
                       <parameter name="userLogRdbmsDeliveryFormat" value="text"/>
                       <parameter name="userLogRdbmsPropertyMaxVarcharSize" value="1000"/>
                       <parameter name="userLogRdbmsPropertyMaxClobSize" value="-1"/>
                       <parameter name="userLogRdbmsPropertyBinaryFormat" value="compressed"/>
                       <parameter name="userLogRdbmsPoolEnabled" value="true"/>
                       <parameter name="userLogRdbmsPoolConnectionTimeout" value="30000"/>
                       <parameter name="userLogRdbmsPoolIdleTimeout" value="600000"/>
                       <parameter name="userLogRdbmsPoolKeepAliveTime" value="0"/>
                       <parameter name="userLogRdbmsPoolMaxLifetime" value="1800000"/>
                       <parameter name="userLogRdbmsPoolMinimumIdle" value="0"/>
                       <parameter name="userLogRdbmsPoolMaximumSize" value="20"/>
                       <parameter name="userLogRdbmsPoolValidationTimeout" value="5000"/>
               </log>
               <log userLogName="DISABLED" autoUpdate="false" userLogClass="com.semarchy.xdi.runtime.sessionlog.EmptyLogger">
               </log>
        </logs>
Step 5. Deploy xDI runtime on ECS
Consult IT for the following privileges to create EFS:
ecs:ListClusters
Go to Amazon Elastic Container Service > Clusters.
Click on Create cluster. Add cluster name and Default namespace.

Keep other configuration as is or change as per your requirements. Click on Create.
It will take few minutes to create the cluster. Wait until it is successfully created.

Now we have to create a new Task Definition, click “Create new task definition”
Provide a task definition name and in Infrastructure requirements add the configuration as per you requirements e.g Launch Type, Operating System, CPU and Memory.


The Image URI can be found in hub.docker.com, search “semarchy/xdi-runtime”
Configure the Environment Variables

XDI_RUNTIME_SESSIONLOG_DB_JDBC_DRIVER_CLASS_NAME= org.postgresql.Driver
XDI_RUNTIME_SESSIONLOG_DB_JDBC_USER=postgres
XDI_RUNTIME_SESSIONLOG_DB_JDBC_PASSWORD=<your_password>
XDI_RUNTIME_SESSIONLOG_DB_JDBC_SCHEMA=runtime
XDI_RUNTIME_SESSIONLOG_DB_JDBC_URL= jdbc:postgresql://instance-1.c3ik0bebqwwr.eu-west-2.rds.amazonaws.com:5432/postgres
XDI_RUNTIME_SESSIONLOG_DEFAULT_LOGLEVEL=400
XDI_RUNTIME_START_EXECUTION_ENGINE=true
XDI_RUNTIME_START_SCHEDULER_ENGINE=true

We need to create 3 volumes and 3 mount points for the xDI runtime container


Create the Task Definition
Now we have to create a service. Click on cluster which is just created and then go to services section. Click on Create.

Under environment section keep the configurations as is.

In the Deployment Configuration section, choose the Task Definition from the “Family” dropdown.

In the Networking section, ensure that the Public IP is turned ON. And add appropriate Security Group.

Keep other configuration as it is or update as per your requirements and click on Create.
The deployment will take some time.
Once the deployment is complete, you will see a service created.

Go to the Cluster > Services > Task > Logs, you should see the Endpoint are started

Step 6. Create an inbound rule to open port 42200
Configure an inbound rule for port 42200, this is for the xDI runtime to be connected by xDI Designer

Step 7. Access the xDI Runtime via xDI Designer
Go back to Cluster > Service > Tasks > Configuration and note down the public ip.

In the xDI Designer, create a new Runtime metadata based on the public IP. Save it. Try to Connect. You should see it Connected.

